Monday, May 26, 2008

Bunny and Coffee

I think I'm on a kick with this Rubber Romance bunny stamp - I just think she is so cute. This time, I paired her with this great coffee saying "With enough caffeine, I could rule the world." Once again, I added a little rhinestone to her belly button and put some glitter on the bunny slippers.


Here are the details:

Stamp: Rubber Romance and InkaDinkaDo (sentiment) Ink: Palette and Copic Markers Card Stock: Stampin Up! Chocolate Chip and Whisper White and Jazz by Colorbok

Thanks for stopping by and taking a look!

Paper Trey Card Box

This weekend I played with some of my Paper Trey stamps. I bought them awhile ago but never got around to using them. Lately I have been trying to take all my stamps that I've never used and put them to good use. I made a set of six cards using various sentiments that come with the set. The one pictured here, "Bloom Where you're planted" is one of my favorites. I also used "With Gratitude" and "Friends Forever".


Now, here's a picture of the little card box I made to put them all in. If you remember in one of my previous posts, this is the box that I learned to make from Allison's workshop in the mail kit - it's a great kit and Allison't instructions (complete with color photos) are great!

I really would prefer the box in Only Orange but I needed a 12" x 12" sheet of cardstock and I didn't have any in that color. I think I see a Stampin Up! order for 12" x 12" paper in my future!

Card Details:

Stamps: Paper Trey, Ink: Versa Magic Persimmon, Stampin Up! Old Olive and Only Orange, Cardstock: Stampin! Up Only Orange and Whisper White Misc: Orange Stickles

Hope you all had a great holiday!


Thursday, May 22, 2008

Rubber Romance "Bunny"

Today I made a card for a friend who was having a bad day. It's one of my favorite Rubber Romance girls, Bunny. I don't know if you can tell in the picture but I added a little rhinestone to her belly button and added a little glitter to her robe and bunny ears. I used my Nestabilities to create the ovals. I'm sorry, but I just had this little scrap of D.P. left and I have no idea who makes it.

Details:

Stamps: Rubber Romance and Inky Antics (sentiment) Paper: Bazill Ink: Palette Noir black and Copic markers Misc: Bella's Baubles and Stampin Up! ribbon

I hope this card brings a smile to my friend's face! Thanks for visiting me today. I am hoping to get a lot of stamping and jewelry making done over the long holiday weekend so please stop by over the weekend to see my creations and have a great Memorial Day!

Tuesday, May 20, 2008

Barbie - with an attitude!

Remember my shopping trip to Joann's over the weekend? Well, I saw some cute Barbie paper and it reminded me of fun sentiment that I have had for quite awhile. Here's the outside of the card:


and here's the inside:

Details:

Stamps: Rubber Romance and Viva Las Vegas (sentiment) Paper: Stampin Up! Pretty in Pink, Barely Banana and Whisper White Ribbon: Polka Dot organdy Ink: Palette Noir and Copic markers Misc: Rhinestones

Here's another version of the card:


Details:

Stamps: Rubber Romance and Viva Las Vegas (sentiment) Paper: Stampin Up! Real and Red and Whisper white and Reminisce "Disco Love" D.P. Ink: Palette Noir Black and Copic markers Misc: Rhinestones

Thanks for stopping by!


Monday, May 19, 2008

Ribbon Storage


As promised, today I am going to talk about ribbon storage. I'll admit it, I just love ribbon - I have tons and tons of it! I am constantly searching for the best method to store my ribbon. Thanks to the discussion forums at SplitCoast Stampers I have found some great ideas for storage. I can't take any credit for the ideas I am sharing with you today - I got all of my ideas from the very talented stampers over at SplitCoast and other bloggers who have shared their ideas for storage.


First, I would like to show you how I store my larger spools of ribbon. I'm talking about the full rolls of Stampin Up! ribbon which contain a lot of ribbon. Previously, I stored them on the rolls in drawers or baskets stashed in my stamping closet. I had so many rolls that they took up a great deal of room and it was difficult to see what I had. As you know, I have 2 cats who are usually in my room with me and they posed another problem - I could not leave my ribbon out because they would end up playing with it and I would find ribbon all through the house. How do I know this - I came home one day to find an entire roll of ribbon strung from my craft room (upstairs) down the hall and stairs!

So, I purchased Cropper Hopper 4 x 6 Ribbon Cards and wrapped my ribbon around it. Here's 2 pictures of the cards so you can see what they look like:


Now, what to store them in? I searched all over and finally found a storage unit I liked at Bed, Bath, and Beyond. It measures 22" w x 15" d x 25" h (with wheels). Believe it or not, I was able to fit ALL of my large ribbon spools into one drawer - and still have a little room left over. I divided the drawer into sections by cutting poster board to fit inside the drawer. That way there is a clear division of the sections. I have taken a picture for you of the drawer wtih my ribbons inside:


Now, for my smaller spools of ribbon and ribbon that I got via ribbon shares. For my smaller rolls of ribbon I saw a great idea using clothes pins. Basically, all you do is wrap the ribbon around the pin and then I secured them in place with Goody pony tail holders that I purchased at Wallmart. The pins I bought were actually called Doll Pins at Joann's. Here's a picture so you get the idea:


Now, what I consider the best idea of all - what to store all those clothes pins in. I bought a clear jar at Bed, Bath, and Beyond to put all my ribbon spools into. After using my coupon I think I ended up paying about $5 for this large jar. I sat the jar on a bookcase in my craft room so it's in clear view. I gotta tell you - it just makes me happy to see all the pretty ribbon sitting in the jar! Here's a picture for you:


Thanks for stopping by. I am working on a PG-13 card for tomorrow. It's a funny sentiment that I found in my stash yesterday and that goes perfectly with some Barbie paper I found at Joann's. That's one of my projects for today. Please stop by tomorrow and I'll show you what I came up with!

Sunday, May 18, 2008

Shopping Bella


Sorry I haven't posted much this past week. I injured my back on Tuesday night and I haven't been able to get too much stamping done - until yesterday. I made a shopping trip to Joann's and that inspired me to make a few new cards and to organize my ribbon.

Today's card features shopping bella. It is really a birthday card for my niece who loves to shop. I hope she likes it.
Details:
Stamps: Stamping Bella
Paper: Stampin Up! Bashful blue and Orchid Opulence
Ink: Palette Noir Black and Copic markers
Misc: Rhinestones
Please stop by tomorrow and I'll share some pictures of my ribbon storage for both large and small rolls of ribbon - remember when I said I was an organizaton freak!

Thanks for visiting. I'll try to post more next week - I promise.

Tuesday, May 13, 2008

Bella and Blog Tip

Today I thought I would share another Bella and an organization tip for keeping your own electronic stamping notebook.

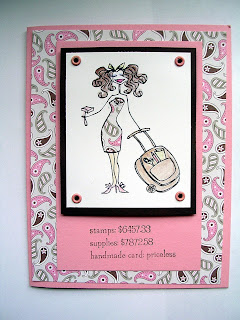
First, the Bella. Today I have stamping bella to show you. I paper pieced her dress using Stamping Up! D.P. I just love the sentiment - which is also from Stamping Bella. It says "Stamps $6457.33 Supplies $7872.58 handmade card: priceless" How true is that!

Details:

Stamps: Stamping Bella Paper: Stampin Up! Chocolate Chip, Pretty in Pink and D.P. Ink: Palette Noir black Technique: Paper Piecing and Gamasol and Colored Pencils Misc: Pretty in Pink Brads (Stampin Up!)

Now, my little tip for organizing all your stamping ideas from blogs. I know that I find so many great ideas on blogs and I thought it would be great to be able to save them and categorize them in a way that I could easily find what I was looking for.

What works best for me is to use Microsoft OneNote 2007 to create an online library of all my favorite cards and ideas. In case you have never used OneNote it is basically nothing more than an electronic notebook. You can create different notebooks and then create groupings under each notebook.

What I did was create a Stamping notebook and then I created categories (called section groups in OneNote) under that for each of my favorite stamp vendors - so I have a category (section group) for Stamping Bella, MFT, Cornish Heritage Farms, Stampin Up!, etc. I even have a category for Tutorials, Gift Ideas - you can add whatever you want. Then I created a sub-category (called a section) under each of these for specific sets or stamps. For example, under Stamping Bella I have a section for CosmoBella. Then, you can just copy and paste or use the "Send to OneNote" command to file the card using that particular stamp in the appropriate location. You don't need to create all your categories and sections at once - I just create them as needed when I want to add to my notebook.

The advantage is that I have all my ideas in one place and I when I paste them into OneNote it keeps all the links to the original post so I can see exactly where I got my idea - and I can give the individual credit for their work. No longer do I need to sit and think - "Where did I see that tutorial on the 2-4-6-8 box?". Also, I can save the entire notebook to a PDF document if I want to take it to another computer that doesn't have OneNote on it.

One thing to keep in mind - you will find an option on your browser to "Send to One Note" - in IE7 this is located under Tools - Send to OneNote. This option will send the entire web page to OneNote and file it under the "Unfiled Notes" section. Then, you will need to go in and move it to the proper location. To get around this, I just highlight the portion of the web page that I want to copy (I typically avoid copying the blog rolls and archive sections on the page) and then just hold down the CTRL + C on the keyboard to copy the highlighted contents. Then, I navigate to OneNote and either go to the location where I want to paste the contents (may need to create the appropriate section group or section) and either use CTRL + V on the keyboard or use the menu in OneNote to Edit - Paste the contents.

I have only used the 2007 version of OneNote so I can't speak to the 2003 version. It is my understanding that the 2007 version is much nicer to use. Also, I use Google reader to subscribe to all my blogs so that I don't need to visit each blog or rely on an email messge to tell me when they have been updated. Google reader is free - you just need to create an account to use it. I just add my subscriptions in Google reader and I log in and it tells me what blogs have been updated with all the links right there for me. I believe there are similar products that do this as well.

I hope you find this tip useful. I know it really works for me - but I am somewhat of an organization "freak". Feel free to contact me if you have any questions.

Monday, May 12, 2008

I'm Back


I hope everyone had a great Mother's Day! Sorry I have been absent for a few days but I had Mother's Day at my house on Sunday and I just haven't had any time to stamp or post to my blog. So, I'm going to show you a bracelet and one of my previous Bella creations - CosmoBella.

I made the bracelet for my Mom for Mother's Day. It's hard to see but I added a charm that says "Mom" and the other charms are all hearts. The other beads are Swarovski crystal hearts and rounds in pink, crystal, red, and fuschia and silver stardust balls. My Mom really liked it! I think I may have to make one for myself too.


Now, for the bella card. It is cosmobella - one of my favorite Bella's! Let me know what you think of her.

Details:
Stamps: Stamping Bella
Paper: Stampin Up! Green Galore and Only Orange
Ink: Stampin Up! Markers
Misc: Ribbon and Charm from Stamping Bella


Thursday, May 8, 2008

MFT Birthday

Good evening! It's late (for me) so I'll keep tonight's post short. I have 2 MFT cards using the gamasol and colored pencil technique. I made matching envelopes for each of the cards. I had to bling them up a bit with a touch of Stickles glitter glue. Sorry, but I have no idea who makes the patterned paper - I bought it long ago. I have tons of paper in my stash that I have yet to use - I just love all those pretty papers!


Details:

Stamps: MFT
Ink: Palette Noir Black
Paper: Stampin Up! Yo Yo Yellow, Brilliant Blue, and Whisper White
Misc: Stickles Glitter Glue


Details:
Stamps: MFT
Ink: Palette Burnt Umber
Paper: Stampin Up! Chocolate Chip and Ruby Red
Misc: Stickles Glitter Glue

Thanks for looking - I'm off to watch Ugly Betty!


Wednesday, May 7, 2008

Sympathy Card

I always have a difficult time making sympathy cards. I want them to be simple, yet have a comforting verse to accompany the image. This Eskimoo saying is one of my favorites for just such an occasion. It reads "Perhaps they are not stars in the sky, but rather openings where our loved ones shine down to let us know they are happy".


Details:

Stamps: Stampscapes and River City Rubber Works (sentiment)

Ink: Versafine Black and VersaMark

Paper: Glossy green card stock

I stamped the tree, ground, and people all in Versamark on the glossy cardstock. Because of the color of the glossy paper it takes on a beautiful shade of green. Then, I just stamped the sentiment in Black Versafine.

A friend of mine, June owns a great little stamp store in Zoar, Ohio and she was the one who taught me about using the VersaMark on the glossy green paper. If you are ever near Zoar be sure to check out her store - you will end up staying all day!

Shopping Bella

First of all, let me thank all of you who visited my blog - I can't believe I actually have comments! I was so excited to see that people have been visiting my new blog. I really wasn't sure if anyone would bother to visit. All of your comments have been so kind and I really appreciate all your support.

Today I have one of my Bella cards to show you. If you do not yet own any Bella's you must get over to Em's site and see them. I will warn you, however, that they are highly addicting!

This card also uses one of my new favorite card sizes. The card measures 11" by 4 1/4" or 5 1/2" by 4 1/4" when folded. I can't take credit for this - I got the idea from Mish, one of my favorite bloggers. That woman is so talented, I think I have a book of all the ideas I have printed from her website.


The Details:

Stamps: Stamping Bella
Ink: Pallete Noir Black and Copic Markers
Paper: Stampin Up! Prints Pack D.P. and Real Red C.S.
Technique: Paper Piecing and Coloring with Copic Markers

Let me know what you think!


Tuesday, May 6, 2008

Oriental - Quick Card


I am Chair of a committee at the university where I work and as I am approaching the end of my term as Chair I wanted to create a nice card for all the committee members to show my appreciation for all their hard work throughout the year. I had to make 13 cards so I wanted it to be something I could mass-produce relatively easily and also have a motivational theme. Here's what I came up with - let me know what you think.

The details:

Stamps: Penny Black and Stamp in the Hand (Chinese symbols)
Ink: Adirondack Pesto and VersaFine Black
Cardstock: Stampin Up! Old Olive and Very Vanilla


Sassy Card Box

I took a great "Workshop in the Mail" class from Allison. The class used the Tart and Tangy set from Stampin Up! and included the stamp set and everything you need to make all four cards and the card box. I then created my own set of "girly" cards and matching card box. One of the great things Allison included in the kit was matching envelope liners - something I haven't done in awhile. I don't know why I don't do that more often, I think it adds a nice finished touch to the cards. Here's a pic of a card and matching envelope:


Here's some of the other cards I created to go in the box:


Finally, here is the card box for all the cards to go in:


The Details:
Stamps: Stampendous Sassy Silhouettes
Card Stock: Bazill and Provo Craft D.P. (Rob and Bob Studio - Girly Girl)
Misc: Punches, Velcro circle to close card box


Monday, May 5, 2008

Welcome!


Welcome to my new blog, Stamping Cat Studio. It is so named because whenever I stamp I have my two cats who like to join me, Macy and Patches - I guess you could call them my stamping muse - or is that meows?!

I am new to blogging - although I have been lurking and reading blogs for about a year now. I decided it was time I finally tried my hand at blogging! In addition to rubber stamping, I love to make jewelry - I hope to share some of those pictures as well. I think jewelry-making and card-making go hand and hand. Although, I am finding that I need more space in my craft room to house both of my hobbies.