Monday, May 26, 2008

Bunny and Coffee

I think I'm on a kick with this Rubber Romance bunny stamp - I just think she is so cute. This time, I paired her with this great coffee saying "With enough caffeine, I could rule the world." Once again, I added a little rhinestone to her belly button and put some glitter on the bunny slippers.


Here are the details:

Stamp: Rubber Romance and InkaDinkaDo (sentiment) Ink: Palette and Copic Markers Card Stock: Stampin Up! Chocolate Chip and Whisper White and Jazz by Colorbok

Thanks for stopping by and taking a look!

Paper Trey Card Box

This weekend I played with some of my Paper Trey stamps. I bought them awhile ago but never got around to using them. Lately I have been trying to take all my stamps that I've never used and put them to good use. I made a set of six cards using various sentiments that come with the set. The one pictured here, "Bloom Where you're planted" is one of my favorites. I also used "With Gratitude" and "Friends Forever".


Now, here's a picture of the little card box I made to put them all in. If you remember in one of my previous posts, this is the box that I learned to make from Allison's workshop in the mail kit - it's a great kit and Allison't instructions (complete with color photos) are great!

I really would prefer the box in Only Orange but I needed a 12" x 12" sheet of cardstock and I didn't have any in that color. I think I see a Stampin Up! order for 12" x 12" paper in my future!

Card Details:

Stamps: Paper Trey, Ink: Versa Magic Persimmon, Stampin Up! Old Olive and Only Orange, Cardstock: Stampin! Up Only Orange and Whisper White Misc: Orange Stickles

Hope you all had a great holiday!


Thursday, May 22, 2008

Rubber Romance "Bunny"

Today I made a card for a friend who was having a bad day. It's one of my favorite Rubber Romance girls, Bunny. I don't know if you can tell in the picture but I added a little rhinestone to her belly button and added a little glitter to her robe and bunny ears. I used my Nestabilities to create the ovals. I'm sorry, but I just had this little scrap of D.P. left and I have no idea who makes it.

Details:

Stamps: Rubber Romance and Inky Antics (sentiment) Paper: Bazill Ink: Palette Noir black and Copic markers Misc: Bella's Baubles and Stampin Up! ribbon

I hope this card brings a smile to my friend's face! Thanks for visiting me today. I am hoping to get a lot of stamping and jewelry making done over the long holiday weekend so please stop by over the weekend to see my creations and have a great Memorial Day!

Tuesday, May 20, 2008

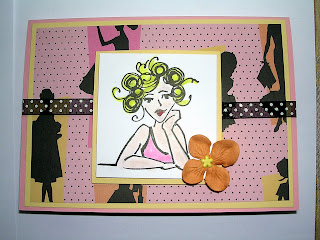
Barbie - with an attitude!

Remember my shopping trip to Joann's over the weekend? Well, I saw some cute Barbie paper and it reminded me of fun sentiment that I have had for quite awhile. Here's the outside of the card:


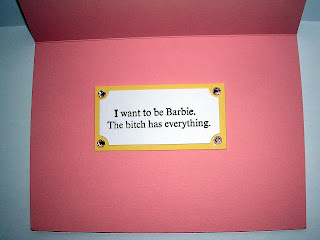
and here's the inside:

Details:

Stamps: Rubber Romance and Viva Las Vegas (sentiment) Paper: Stampin Up! Pretty in Pink, Barely Banana and Whisper White Ribbon: Polka Dot organdy Ink: Palette Noir and Copic markers Misc: Rhinestones

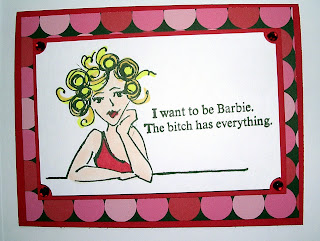
Here's another version of the card:


Details:

Stamps: Rubber Romance and Viva Las Vegas (sentiment) Paper: Stampin Up! Real and Red and Whisper white and Reminisce "Disco Love" D.P. Ink: Palette Noir Black and Copic markers Misc: Rhinestones

Thanks for stopping by!


Monday, May 19, 2008

Ribbon Storage


As promised, today I am going to talk about ribbon storage. I'll admit it, I just love ribbon - I have tons and tons of it! I am constantly searching for the best method to store my ribbon. Thanks to the discussion forums at SplitCoast Stampers I have found some great ideas for storage. I can't take any credit for the ideas I am sharing with you today - I got all of my ideas from the very talented stampers over at SplitCoast and other bloggers who have shared their ideas for storage.


First, I would like to show you how I store my larger spools of ribbon. I'm talking about the full rolls of Stampin Up! ribbon which contain a lot of ribbon. Previously, I stored them on the rolls in drawers or baskets stashed in my stamping closet. I had so many rolls that they took up a great deal of room and it was difficult to see what I had. As you know, I have 2 cats who are usually in my room with me and they posed another problem - I could not leave my ribbon out because they would end up playing with it and I would find ribbon all through the house. How do I know this - I came home one day to find an entire roll of ribbon strung from my craft room (upstairs) down the hall and stairs!

So, I purchased Cropper Hopper 4 x 6 Ribbon Cards and wrapped my ribbon around it. Here's 2 pictures of the cards so you can see what they look like:


Now, what to store them in? I searched all over and finally found a storage unit I liked at Bed, Bath, and Beyond. It measures 22" w x 15" d x 25" h (with wheels). Believe it or not, I was able to fit ALL of my large ribbon spools into one drawer - and still have a little room left over. I divided the drawer into sections by cutting poster board to fit inside the drawer. That way there is a clear division of the sections. I have taken a picture for you of the drawer wtih my ribbons inside:


Now, for my smaller spools of ribbon and ribbon that I got via ribbon shares. For my smaller rolls of ribbon I saw a great idea using clothes pins. Basically, all you do is wrap the ribbon around the pin and then I secured them in place with Goody pony tail holders that I purchased at Wallmart. The pins I bought were actually called Doll Pins at Joann's. Here's a picture so you get the idea:


Now, what I consider the best idea of all - what to store all those clothes pins in. I bought a clear jar at Bed, Bath, and Beyond to put all my ribbon spools into. After using my coupon I think I ended up paying about $5 for this large jar. I sat the jar on a bookcase in my craft room so it's in clear view. I gotta tell you - it just makes me happy to see all the pretty ribbon sitting in the jar! Here's a picture for you:


Thanks for stopping by. I am working on a PG-13 card for tomorrow. It's a funny sentiment that I found in my stash yesterday and that goes perfectly with some Barbie paper I found at Joann's. That's one of my projects for today. Please stop by tomorrow and I'll show you what I came up with!

Sunday, May 18, 2008

Shopping Bella


Sorry I haven't posted much this past week. I injured my back on Tuesday night and I haven't been able to get too much stamping done - until yesterday. I made a shopping trip to Joann's and that inspired me to make a few new cards and to organize my ribbon.

Today's card features shopping bella. It is really a birthday card for my niece who loves to shop. I hope she likes it.
Details:
Stamps: Stamping Bella
Paper: Stampin Up! Bashful blue and Orchid Opulence
Ink: Palette Noir Black and Copic markers
Misc: Rhinestones
Please stop by tomorrow and I'll share some pictures of my ribbon storage for both large and small rolls of ribbon - remember when I said I was an organizaton freak!

Thanks for visiting. I'll try to post more next week - I promise.

Tuesday, May 13, 2008

Bella and Blog Tip

Today I thought I would share another Bella and an organization tip for keeping your own electronic stamping notebook.

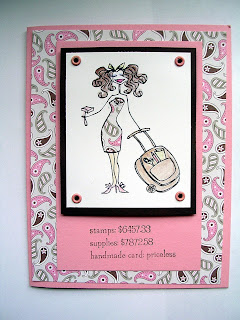
First, the Bella. Today I have stamping bella to show you. I paper pieced her dress using Stamping Up! D.P. I just love the sentiment - which is also from Stamping Bella. It says "Stamps $6457.33 Supplies $7872.58 handmade card: priceless" How true is that!

Details:

Stamps: Stamping Bella Paper: Stampin Up! Chocolate Chip, Pretty in Pink and D.P. Ink: Palette Noir black Technique: Paper Piecing and Gamasol and Colored Pencils Misc: Pretty in Pink Brads (Stampin Up!)

Now, my little tip for organizing all your stamping ideas from blogs. I know that I find so many great ideas on blogs and I thought it would be great to be able to save them and categorize them in a way that I could easily find what I was looking for.

What works best for me is to use Microsoft OneNote 2007 to create an online library of all my favorite cards and ideas. In case you have never used OneNote it is basically nothing more than an electronic notebook. You can create different notebooks and then create groupings under each notebook.

What I did was create a Stamping notebook and then I created categories (called section groups in OneNote) under that for each of my favorite stamp vendors - so I have a category (section group) for Stamping Bella, MFT, Cornish Heritage Farms, Stampin Up!, etc. I even have a category for Tutorials, Gift Ideas - you can add whatever you want. Then I created a sub-category (called a section) under each of these for specific sets or stamps. For example, under Stamping Bella I have a section for CosmoBella. Then, you can just copy and paste or use the "Send to OneNote" command to file the card using that particular stamp in the appropriate location. You don't need to create all your categories and sections at once - I just create them as needed when I want to add to my notebook.

The advantage is that I have all my ideas in one place and I when I paste them into OneNote it keeps all the links to the original post so I can see exactly where I got my idea - and I can give the individual credit for their work. No longer do I need to sit and think - "Where did I see that tutorial on the 2-4-6-8 box?". Also, I can save the entire notebook to a PDF document if I want to take it to another computer that doesn't have OneNote on it.

One thing to keep in mind - you will find an option on your browser to "Send to One Note" - in IE7 this is located under Tools - Send to OneNote. This option will send the entire web page to OneNote and file it under the "Unfiled Notes" section. Then, you will need to go in and move it to the proper location. To get around this, I just highlight the portion of the web page that I want to copy (I typically avoid copying the blog rolls and archive sections on the page) and then just hold down the CTRL + C on the keyboard to copy the highlighted contents. Then, I navigate to OneNote and either go to the location where I want to paste the contents (may need to create the appropriate section group or section) and either use CTRL + V on the keyboard or use the menu in OneNote to Edit - Paste the contents.

I have only used the 2007 version of OneNote so I can't speak to the 2003 version. It is my understanding that the 2007 version is much nicer to use. Also, I use Google reader to subscribe to all my blogs so that I don't need to visit each blog or rely on an email messge to tell me when they have been updated. Google reader is free - you just need to create an account to use it. I just add my subscriptions in Google reader and I log in and it tells me what blogs have been updated with all the links right there for me. I believe there are similar products that do this as well.

I hope you find this tip useful. I know it really works for me - but I am somewhat of an organization "freak". Feel free to contact me if you have any questions.